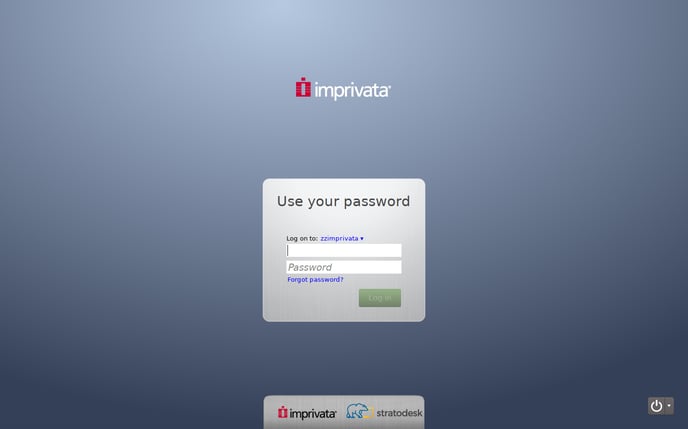
Imprivata's Solutions allow Administrators to Control and Simplify User Access from a NoTouch Device
Imprivata OneSign Single Sign-On (SSO) is a supported login method in NoTouch Desktop. To use Imprivata, you need a working and configured Imprivata appliance. NoTouch OS supports - as does Imprivata - different authentication methods, among them contactless proximity cards, fingerprint and on the other hand simple password authentication. NoTouch also supports secondary authentication (e.g. for prescription of controlled substances as mandated by law in many jurisdictions). Imprivata support is available in Stratodesk NoTouch OS images on all platforms, including PC and Raspberry Pi, and requires NoTouch Center 4.2.58 or later.
Contents
- 1 Basic functionality introduction
- 2 Get going with NoTouch and Imprivata
- 3 Authentication modalities
- 4 Imprivata configuration reference
- 5 Fast User Switching (FUS)
- 6 Advanced custom connection configuration
- 7 Discussion: USB forwarding versus Virtual Channel
- 8 Troubleshooting
Basic functionality introduction
NoTouch contains a client-side software module that consumes the Imprivata ProveID API that is provided by the appliance. The client-side software module drives proximity card readers (if any), communicates with the user, verifies credentials with the Imprivata appliance and finally starts a connection, such as Citrix or VMware View. Once connected to VDI, a "virtual channel" will be established between the Imprivata agent on the VDI side and the Stratodesk Imprivata module, facilitating secondary authentication, enrolling and other workflows (Citrix and Horizon/PCoIP only).
 The configuration in the NoTouch side is easy, since you only need to set how to connect to your Imprivata appliance and some very basic settings.
Get going with NoTouch and Imprivata
Unless you are using #Fast User Switching (FUS), follow these simple steps to get going:
- Make sure your Imprivata appliance is configured and running
- Check that the Imprivata appliance has "Stratodesk" enabled under Settings->ProveID
- Go to the Imprivata configuration parameters in NoTouch (as described in the next section) and configure at least these values:
- Set "Start service" to "on"
- Let "Host" point to the Imprivata appliance (Hostname only! Not a URL)
- In NoTouch Center, assign the IMPR license to the endpoint, if not already done: Licensing#Assigning_licenses
- Either get the CA root certificate of the Imprivata appliance and add it to your NoTouch environment (Certificates) or switch off certificate validation using the "Verify Certificates" parameter
- The root certificate used to sign the SSL certificates can be downloaded from the Imprivata Admin Console. On the SSL tab of the Security page, click the link Click here to download the certificate of this CA. Download the file ssoCA.cer and then import into NoTouch as described in Certificates
- You may set the Agent Type parameter to "Shared Kiosk Workstation" which will enable all VC-based functionality such as secondary authentication. Furthermore, if you do that, disable USB forwarding in the Citrix or Horizon options.
- Reboot the device
Authentication modalities
In most cases you do not have to configure anything on the NoTouch side regarding specific authentication modalities.
Username/password
The Imprivata login dialog allows users to log in with their normal username and password, if this modality is enabled in the Imprivata policies.
Prox card / badge tap
NoTouch supports RFideas prox readers as well as the Imprivata-branded readers (among them IMP-75, IMP-80, IMP-82, ...) for easy badge tap-in and tap-out. No specific configuration is necessary for RFIDeas readers on the NoTouch side. NoTouch will obey all settings made in the Imprivata VA, regarding card type/reader configuration as well as workflow. For instance, you can specify if another user is allowed to "tap over" another active user or not.
Note: The "Tapping mode" parameter on NoTouch is deprecated. Use "No setting" to pull the value from Imprivata.
NoTouch certainly supports additional PIN authentication requirements as well as card enrolling.
NoTouch includes a command-line utility rfideascmd to manipulate RFIDeas readers. It is intended for diagnostic use only, in normal operation it is not necessary - please see RFideas prox readers for more information.
Fingerprint
NoTouch supports the Imprivata-branded DigitalPersona fingerprint readers. Other fingerprint readers based on the Upek stack may work, but it is guaranteed only for the aforementioned readers.
You can disable fingerprint support in the NoTouch parameters (even though it may be enabled in Imprivata and a reader connected, you can still disable it should the need arise).
Smartcards
To use smartcards in an Imprivata login scenario, please:
- In Services set - Smartcard|Start Service: to On
- Reboot
Questions and answers/SSPR
Similar to username/password, when using QnA (Question and Answers) or SSPR (Self-Service Password Reset), NoTouch will obey the settings specificed in the Imprivata policies and display the required questions.
Imprivata configuration reference
Basic Imprivata parameters
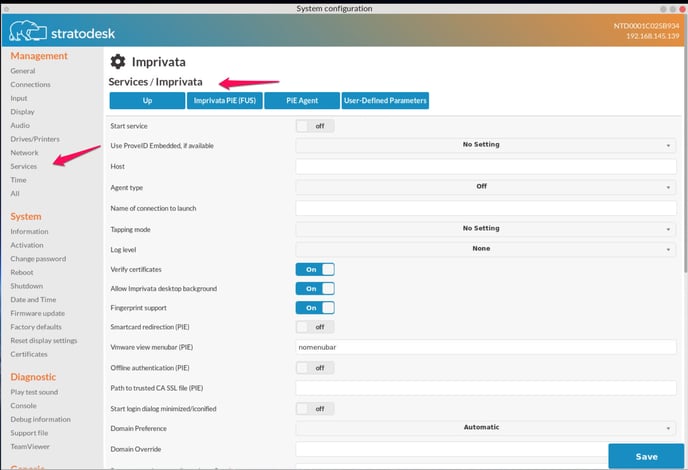
The Imprivata parameters are part of the Services parameter. Navigate to the Services tab and look for "Imprivata". The important parameters are:
- Start service. This is the master switch to use the Imprivata functionality. To use Imprivata OneSign SSO, switch it to "on".
- Host. The DNS host name of the Imprivata appliance.
- Verify certificates. Denotes if NoTouch should check certificates. By default this is on. If you have just set up the Imprivata VA in a lab environment without a proper SSL certificate, switch this off.
- Agent Type. This parameter defines how the Virtual Channel should behave. In most cases this will be set to Shared Kiosk Workstation.
- Off. No Virtual Channel is provided.
- Shared Kiosk Workstation. This opens the VC communication path and can be used for all sorts of VC communication including secondary authentication (such as fingerprint for electronic prescriptions)
- Fast User Switching. This setting enables the very specific #Fast User Switching (FUS) scenario (see below).

Other Imprivata parameters
- Allow Imprivata desktop background. If that is on (default), the system's desktop background will be pulled from the Imprivata Virtual Appliance, preempting anything that is set in the NoTouch parameters.
- Fingerprint support.. Allow (default) or disallow the use of fingerprint devices.
- Start login dialog minimized/iconified. By default, the Imprivata login dialog will be shown and it will be on top of all other Windows. Some users found they wanted to realize a scenario where they didn't want to see the Imprivata login dialog, but still have the system actively waiting for badge taps. In this case, set this parameter to "on".
- Name of connection to launch. This is the Name of the "Resource" or Session to launch. This needs to match what is being published by Imprivata. If you have multiple resources, be sure to match Name of connection to Launch with the resource you wish to launch
- Log level. By default this is set to "none" to indicate no logging is desired. In case you run into problems or when directed by any vendor's support engineers, switch it to "debug".
- Domain Preference. This is used very seldomly (sometimes with VMware Horizon View). When receiving the username and domain from the Imprivata API, we may get presented multiple options, most notably a NetBIOS type domain (like WWCO) and a DNS domain (like wwco.net). This switch denotes what format should be used to log in to your VDI. VMware Horizon as of Q1/2018 only accepts NetBIOS domain format, and NoTouch is quite good at figuring this out, but in certain circumstances you may have to set this.
- Domain Override. If you have a very complicated domain forest/setup, you may have a need to override the domain portion with a static value. E.g. Imprivata delivers x1.ou.wwco.net, but you know for VDI you want x.wwco.net, then use this parameter to set the domain value to be used.
- Tapping mode. With this parameter you can specify what should happen if the user taps the proximity card while a session is established. This parameter
- No setting. Pull the value from the Imprivata VA (default, and most reasonable).
- None. This setting denotes that nothing should happen.
- Close running connection. This setting disconnects the user.
- Close running connection and allow user switch. Similar to the setting above this disconnects the user, but it allows to begin login for a different card. Use this if you want one user to be able to disconnect another one.
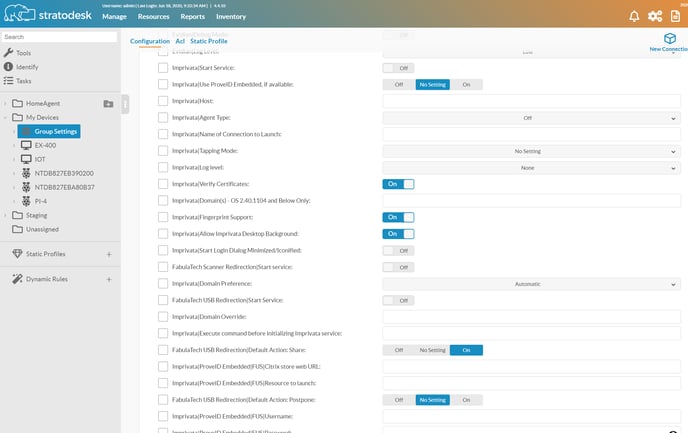
Imprivata configuration in NoTouch Center:
Connection-specific virtual channel configuration
There are also configurations within Citrix or VMware to specifically enable support of their respective Virtual Channel drivers; both named Imprivata VC Extension . See Connections → <Citrix Connection> → Citrix and Connections → <VMware Connection> → VMware for these parameters if you wish to explicitly disable the VC driver; it is always enabled by default (as long as Imprivata is configured with an Agent type that uses the Virtual Channel).
Fast User Switching (FUS)
Fast User Switching (FUS) for XenApp is a specific Imprivata feature. It behaves very different than all other modes. In a FUS scenario, the endpoint logs in to the Citrix XenApp connection with a generic service account. Once that is launched, badge taps will be sent of the Virtual Channel to the remote agent, prompting e.g. Epic login/user switch.
To set up FUS:
- Make sure your Imprivata appliance is configured and running
- Check that the Imprivata appliance has "Stratodesk" enabled under Settings->ProveID
- Create and configure a Citrix connection in NoTouch.
- Use a generic user (service account)
- Make sure the connection works, that it launches the correct app
- Most probably you'll want to set "Autostart at boot" to "on"
- Go to the Imprivata configuration parameters in NoTouch and configure at least these values:
- Set "Start service" to "on"
- Let "Host" point to the Imprivata appliance (Hostname only! Not a URL)
- Set "Agent type" to "Fast User Switching"
- Either get the CA root certificate of the Imprivata appliance and add it to your NoTouch environment (Certificates) or switch off certificate validation using the "Verify Certificates" parameter
- The root certificate used to sign the SSL certificates can be downloaded from the Imprivata Admin Console. On the SSL tab of the Security page, click the link Click here to download the certificate of this CA. Download the file ssoCA.cer and then import into NoTouch as described in Certificates
- Reboot the device
Note: We have found that for successful tap-out in some scenarios the registry key LockRemoteSessionWithAgentOnClient=1 had to be added in the VDA.
Advanced custom connection configuration
By default, in an Imprivata ProveID login scenario, NoTouch will pull all VDI broker information from the Imprivata VA. However, if you want to use fine grain controls of the VDI systems (simple example, say you want to disable Audio on Citrix), you have no way to express that in the Imprivata VA, but you can and should do so through the NoTouch system. It works by simply creating a connection as you would do in NoTouch without Imprivata, and then supplying the name of this connection to the Stratodesk Imprivata configuration. The NoTouch Imprivata client will then use the configured connection profile.
- Create a connection
- Configure it with connection mode and target
- Do all your fine grain configuration
- Test the connection with normal username/password authentication
- Have your Imprivata set up ready and working as described above in #Get going with NoTouch and Imprivata
- Go to the Services->Imprivata parameters and type in the exact name of the connection into the "Name of connection to launch" parameter
Discussion: USB forwarding versus Virtual Channel
This section applies to any use case where an authentication device is used inside an established connection, as opposed to logging in to that connection. Typically this is referred to as secondary authentication. A typical use case is "log in via badge tap but require fingerprint when prescribing a controlled substance". In this example use case, the fingerprint reader must be made available to the VDI Windows. There are two main ways to achieve that:
- Generic USB forwarding, as offered by Citrix XenDesktop and VMware Horizon View
- The Imprivata virtual channel functionality
In case of #Fast User Switching (FUS) on XenApp, the case is clear - USB forwarding does not help, because XenApp doesn't do USB forwarding. In other cases it is your choice. USB-forwarding the device is absolutely valid, however we strongly advice against mixing VC and usb forwarding on the same machine. Either switch off the VC functionality or the USB forwarding functionality (to be more precise, prohibit your fingerprint readers or prox readers from being forwarded.
- Citrix USB forwarding: Citrix Receiver configuration#USB forwarding
- VMware USB forwarding: VMware Horizon View USB forwarding
We have found that in many case, VC is the better alternative, it uses less bandwidth and can deal with higher connection latencies. On the other hand, USB forwarding is the most compatible approach, as the Windows VDI instance is given full control of the device.
Troubleshooting
In case you experience any issues, please first go through this checklist:
- Is your Imprivata VA reachable from the client? Think about Firewalls, Proxies, etc.
- Are you using a ".local" domain? If so, it is accessible via real DNS?
- Did you install the certificate or disable certificate verification?
- Is Stratodesk enabled in the Settings->ProveID dialog?
- Are you using either USB forwarding or the Virtual Channel?
- Decide for one or the other - but not both at the same time!
- Do the user policies and computer policies return a proper VDI broker configuration? Setting it up only in Imprivata's computer policies is not enough - check the user policies as well!
Specific scenarios / Known issues
- On PCoIP, at some point after reconnecting, the fingerprint reader will stop working.
- Solution: The Windows agent is trying to connect via Blast. You need to disable that explicitly. Set the Windows registry key Software\SSOProvider\VDI\UseVMwareBridge to FALSE.
- You perform Imprivata-based login, but Horizon or Citrix is telling you that user credentials are wrong.
- Solution: In the NoTouch configuration, set the "Domain Preference" parameter to "NetBIOS". Reboot the endpoint.
- Are you experiencing a 20s Windows login delay when logging to a Type 3 Agent (Citrix/Terminal Server)?
- Solution: Switch the Agent Type to "Shared Kiosk Workstation" - it needs the VC to operate properly
Contacting support
If you are still unable to solve your issue, please
- Set the Imprivata log level in the NoTouch configuration to "debug"
- Provoke/reproduce the error
- Create a support file and send it to support
In case of problems with RFIDeas readers, you may check out RFideas prox readers and potentially use the command line utility. A reader configuration dump is generated as part of the support file however.

