Administrators can centrally provision wireless settings, and authentication, including any relevant certificates. Users can easily switch wifi networks while mobile
This article describes Wireless LAN functionality up to OS version 2.36. This information is outdated and does not apply to all versions up from 2.37 ("Hetch Hetchy", September 2013) and newer. If you have a newer version, please refer to Wireless LAN.
Contents
Introduction
NoTouch of course supports operating with Wireless LAN/WiFi/802.11/WLAN networks, with and without personal or enterprise authentication methods. Whenever a supported wireless network adapter is present, you can connect to available WiFi networks in your area. NoTouch offers two scenarios:
- A system administrators presets one or several allowed and configured wireless networks (see #Configuring wireless networks)
- Users can use a graphical tool to connect to any available network that they may have access to, such as in hotels, airplanes, cafes, ... (#Allow users to configure WiFi)
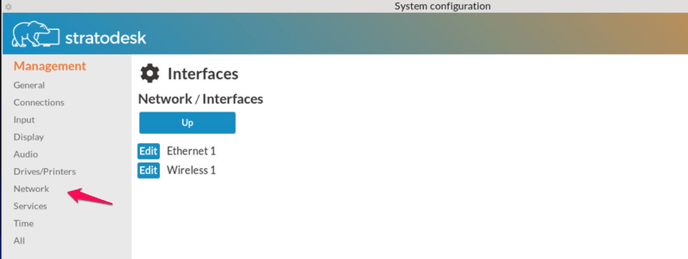
You can easily find out if your system has a supported wireless network adapter. Just open the local configuration application. Click on Network, click on Interfaces. If you see "Wireless 1" here - like in the screenshot above -, you are capable of using WLAN/WiFi.
Configuring wireless networks
It is very easy to setup a wireless connection. Simply open the local configuration application or In NoTouch Center Wireless LAN.
If on the client, click on Network, click on Interfaces. Click "edit" near the "Wireless 1" interface, Select Wireless LAN.
There are two parameters that must be set in any case:
- Network name (SSID). Set this to the SSID of your wireless network.
- Authentication/Encryption. Set this to your desired authentication method. If you just have a "WiFi password", then select "WPA/WPA2 Personal". For information about the other methods, please consult this article: Network authentication
After setting these parameters and clicking on "Change", the view changes, as more parameters appear, depending on your chosen Authentication method. In this example we assume you are using "WPA/WPA2 Personal":
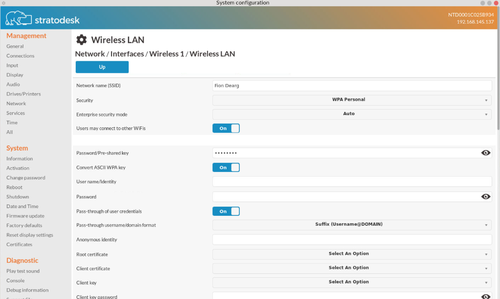
Type in your WiFi passphrase or password into the parameter "Encryption Key/Password". This is also known as the "Pre-Shared Key" or simply PSK. Make sure you don't mistype it. Repeatedly mistyping a passphrase is the #1 error cause for failing WiFi connections!
In most cases you are fine and can click on "Change" and later on save the configuration and reboot. There are a few more parameters though:
- Convert ASCII WPA key. This switch defines if the passphrase should be converted to hex key format or not. In most cases your setup will work either way, but if you can't connect, please switch this parameter to the other value.
- Scan with SSID-specific Probe Request frames. The default value here is "1" which means that the system will send such SSID-specific probe requests. This makes network scanning a bit slower, but allows to detect "hidden" SSIDs. If you have a hidden SSID, most probably you need to this have on 1. You may set this to 0 which improves scanning speed. You can try - if it doesn't work, revert back to 1.
The following parameters are more special and should be left on defaults unless you really know what you are doing:
- Access Point scan mode. This parameter defines the software method how to scan for access points. There is almost no scenario where a change could make sense, so leave it on the default.
- Connection mode. By default, this is set to "Infrastructure", which means you are connecting to an access point. This is the most common WiFi scenario. If you need to connect to an ad-hoc network, you can change this parameter.
- Channel. Here you can select a specific WLAN channel.
Should you have selected an enterprise authentication method, other parameters might be visible, such as:
- Identity. A username.
- Password. The user's password (not to be confused with the WLAN passphrase).
- Root certificate. The root certificate of your authentication authority. Refer to Certificates to find out how to upload certificates.
- Client certificate. The certificate of the client to be presented to the server. Refer to Certificates to find out how to upload certificates.
One warning - if you are doing these changes in NoTouch Center, please don't forget to set the "Primary Interface" parameter correctly (only necessary when in NoTouch Center): Configure Wi-Fi (NTC)
If you need to make a more complicated setup, such as using an authentication method that is not present here or creating more than one preconfigured WiFi setups, please read on here: WPASupplicant
Allow users to configure WiFi
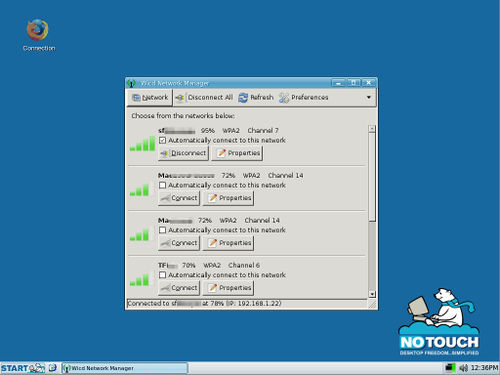
NoTouch comes with the Network Manager, an easy to use module that allows end users to configure WiFi connections themselves, much like they would on a Windows PC or Mac. To activate the Network Manager, please follow these steps:
- Open the local configuration application
- Go to "Services" and then "Network Manager"
- Set the parameter "Network Manager" to "on"
- Change, save, reboot
If you want to deactivate the Network Manager and return to the other configuration methods, simply follow these instructions, but set the parameter to "off".
Two important hints:
- The Network Manager in NoTouch will only configure wireless connections.
- By switching on the Network Manager, all other methods of WLAN configuration (such as under Interfaces or WPASupplicant) are deactivated and will not be read, no matter what you have configured there.
NoTouch Center
Please see the information above first. Again, this article documents how it was done until 2.36 and NoTouch Center 4.1.25. Newer versions please refer to Wireless LAN. For Wireless LAN configuration of NoTouch Center 4.1.25 and earlier please be sure to set the "primary interface" parameter as described below.
Presetting WiFi configuration by the system administrator
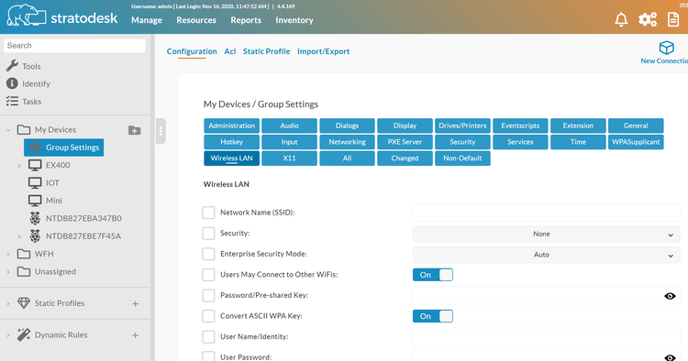
If you want to use Wi-Fi on your NoTouch machines, you can define the connection data in the "Wireless LAN" tab found in "Group Settings" (unless you have more specific needs regarding Network authentication or even WPASupplicant):
Using the Network Manager
If you like the Network Manager, simply set the "Network Manager" parameter under "Services" to "on". Make sure your endpoints reboot to activate the setup. Activating the Network Manager will overshadow all other settings you may have made; i.e. they will not be used as long as Network Manager is activated.