Deploying a client certificate to a Firefox or Chromium connection via NoTouch Center
Introduction
Client certificates can be used in different scenarios where machine certificates cannot be utilized as a way to verify the authenticity of the end point of the device or as an additional requirement as part of the authentication process. One such common use case is to have Citrix Gateway or Citrix ADC request a valid client certificate before allowing the user to log in.
How to do it
This functionality requires your NoTouch Center needs to be on version 4.4.200 or later and your endpoints on NoTouch OS version 3.2.760. Your client certificate needs to have been verified to work in a Firefox browser on another platform. (Try importing your certificate through Options -> Privacy & Security -> Certificates -> View Certificates. If it does not work, fix your certificate before proceeding)
In the first step we need to upload the client certificate to NoTouch Center:
- Zip your .pfx certificate to a .zip, e.g., zip myClientCertificate.pfx to myClientCertifcate.zip.
- Log in to your NoTouch Center and navigate to Resources on the top and the select Certificates.
- From the right side, click Assignable Certificates.
- Drag and drop your certificate to the Upload Certificate -box and click green upload icon or press the Upload All -button.
- Wait for the upload to finish before proceeding.
Next, the certificate needs to be assigned to the appropriate group:
- Navigate to the Group to which you want to deploy the client certificate and click Group Settings.
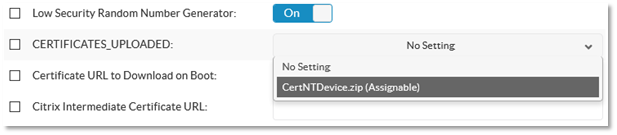
- Click the Security -button and in the CERTIFCATES_UPLOADED -setting and click the dropdown box to select your zipped client certificate.
- Click Announce to make the setting take effect immediately. NOTE: Please do not perform an Announce in large production environments, rather let the normal announcement interval pass.
- If this is a test environment, you can reboot the devices to initiate the download of the certificate.
- After the reboot, you can verify that your certificate has been deployed at the end point.
- Go to an endpoint and select Web Access and log in.
- Scroll down until you see Certificates on the left side of the window.
- You should see your zipped client certificate under Assignable certificates.

Importing the client certificate to a Firefox connection
To import the client certificate available on the device to Firefox, follow the steps below:
- Select your Firefox connection and click the Firefox -button.
- Scroll all the way down until you see the Software Security Device (file=password, ...): -setting.
- In the Software Security Device: -field specify the certificate file as .pfx and the password you specified when the certificate was exported.
- To have Firefox automatically select the client certificate, specify security.default_personal_cert="Select Automatically" in the Userdefined Preferences in prefs.js -setting

To have the setting take effect immediately, press Announce. Again, in larger production environments, let the normal Announce interval pass.
Now you can start your Firefox browser on the NoTouch OS endpoint, type about:preferences#privacy in the address bar and then scroll all the way down to Certificates -> View Certificiates…. to verify that the certificate has been imported into Firefox:
Importing the client certificate to a Chromium connection
NOTE: To deploy a client certificate to Chromium, your NoTouch Center needs to be on version 4.4.230 or higher. Complete these steps to define the import the client certificate to a Chromium connection:
- Select your Chromium connection and click the Chromium - button
- Scroll all the way down until you see the Chromium Software Security Device (file=password, ...): -setting.
- In the Software Secuirty Device: -field specify the certificate file as .pfx and the password you specified when the certificate was exported, like below

- To have Chromium automatically select the client certificate you need to complete the following steps:
- Create a .json file like the following
{
"AutoSelectCertificateForUrls": ["{\"pattern\":\"VdiGatewayURL:Portnumber\",\"filter\":{\"ISSUER\":{\"CN\":\"CNNameOfCertIssuer\"}}}"]
}
Where the italics need to be changed to match your environment. One example below, where the GW URL is Citrix.BestBank.com, the port 443 and the common name for the issuing Certificate Authority CA1-BestBank:
{
"AutoSelectCertificateForUrls": ["{\"pattern\":\"https://Citrix.BestBank.com:443\",\"filter\":{\"ISSUER\":{\"CN\":\"CA1-BestBank\"}}}"]
}
-
- Upload the .json file to the Misc. Files section under Resources in NoTouch Center.
- On the Group Settings of your devices where you want to deploy the certificate, click the Extension -button and scroll all the way down.
- At the Chromium JSON policy file URL: -field, click the Choose File -button to specify the file you just uploaded

To have the setting take effect immediately, press Announce. Again, in larger production environments, let the normal Announce interval pass.
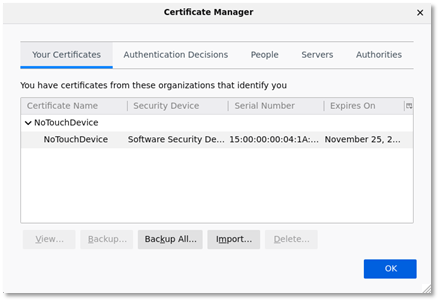
Now you can start your Chromium browser on the NoTouch OS endpoint and type chrome://settings/certficates in the address bar. The client certificate should now show up under the Your certificates -tab:

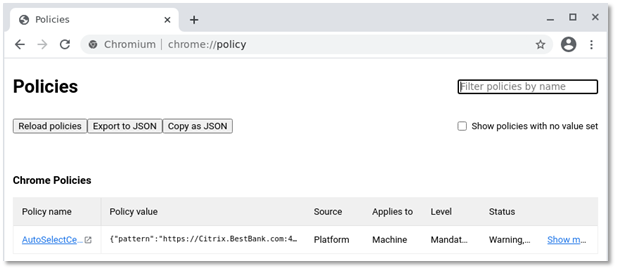
To verify that your auto select policy that you defined with the .json file has taken effect, type chrome://policy in the address bar. If you managed to get the syntax correct your policy will display: