PXE boot is a way to boot computer systems from the network instead of a local disk. PXE allows to use computers without a local disk (diskless operation) at all.
Contents
- 1 PXE booting using Stratodesk Virtual Appliance
- 2 Deployment considerations
- 3 Modifying DHCP server options
- 4 Stratodesk PXE technical background
PXE booting using Stratodesk Virtual Appliance
Stratodesk Virtual Appliance includes a ready-to-go PXE boot service.
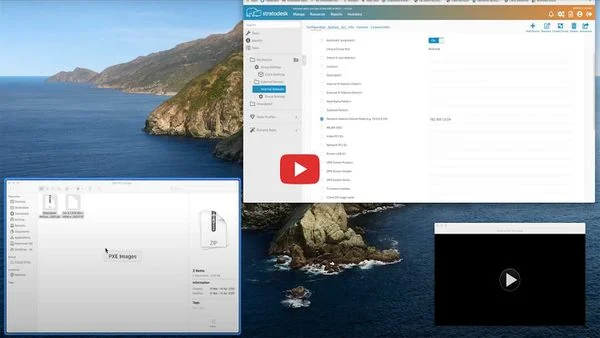
When you have set up Stratodesk Virtual Appliance, you need to log in to its administration interface (port 80 or 443, //YourIPAddress/va-admin not NoTouch Center) and do only two things:
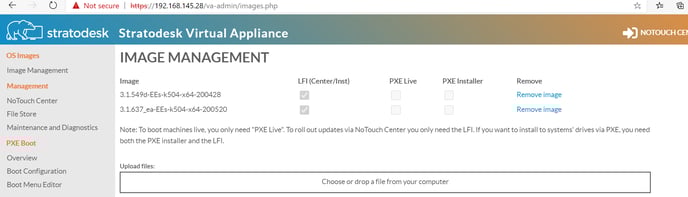
- Upload an OS image (i.e. you'd upload the NoTouch OS ZIP file by clicking on "OS images" and then "upload OS image".
- Click on the "PXE" main menu item, this screen will tell you what DHCP options you have to set in your network. Once you make these modifications, it will work out of the box. Be cautious and ensure there is no other existing PXE configurations in the environment.

Note: If you are trying this out on a desktop virtualization product such as VMware Workstation, VirtualBox, Parallels or similar and use "internal"/"shared" networks you'll need to modify the internal DHCP service of your virtualization product; if you use bridged networks, you'll need to modify your regular DHCP server.
Live boot versus install
Stratodesk Virtual Appliance supports both live-booting and installing on the harddrive via PXE boot. In fact, by default, a boot menu will be shown for a few seconds exactly as it is done when booting from a prepared USB drive (you can change this, see below):
Download versus network block device
A machine booted via PXE can either download the whole operating system at boot time (depending on actual, typically between 100 and 400 MB in size) or use a streaming approach to only fetch those portions that are needed. The latter builds on the Linux "network block device" functionality, thus it is called "Network block device".
It is not possible to say what is better. In fact, most people prefer the download method since it makes endpoints independent (if the PXE server goes away, it would not matter for a machine already booted with this method). If you really care about network load at booting, then network block device is for you, even though it generates a dependency on the Virtual Appliance.
PXE configuration
In the Virtual Appliance administration console, by clicking on PXE and the "Configuration" menu item below "PXE", you can change the PXE configuration, such as:
- Timeout in seconds. The time the boot menu will be shown.
- Show boot prompt. The boot prompt can be shown "always", "never", or when Shift or Alt is pressed ("hidden key sequence").
- Default OS image. If the user doesn't choose otherwise, this is the "label" that will be booted after timeout or by pressing Enter. Edit the labels and boot images below in the "Detailed image configuration".
- Image access policy. On "Download" images will be download to the endpoint's RAM and executed. "Network block device" only fetches blocks that are needed, which saves RAM and network capacity, but makes endpoints dependent on the server.
Furthermore, you can edit the boot menu, i.e. the textual contents of what the user will be seeing, as well as the actual bootable images and their labels as well as kernel parameters. You might not have to ever edit any kernel parameters (we know that sounds scary), but if you choose to make multiple images available, assign easy-to-read and easy-to-type labels. In fact a valid label would just be the number 1 and the number 2. So you could create a boot menu that lets user choose between 1 and 2.
Detailed image configuration
The section "Detailed image configuration" allows to selectively enable or disable live-boot or install functionality per NoTouch version that is present on the VA. It also allows you to define custom labels that users will have to type in to start a certain. These labels should match the boot menu or else you'll confuse your users!
Please note that this is essentially a system administrator thing. End users will be much more happy with just having one single OS image that's been booted without them even think about it.
Boot menu editor
The boot menu editor lets you modify the system
Deployment considerations
WAN, Internet, VPN
PXE boot involves low-level network protocols like DHCP and TFTP that are typically used in LANs only and not over Internet or VPNs. While it is possible to make it running over WAN links, we strongly suggest to use PXE server environments, i.e. instances of the Stratodesk Virtual Appliance or NoTouch OS instances with their builtin PXE service capability in each remote location. When deploying Virtual Appliances to other locations, we advise to deactivate NoTouch Center in the satellite instances as your management will be easier when only one instance is used. To avoid downloading client images over WAN links, to ready-to-go solutions exist:
- You can upload your client OS image(s) one time to the remote VA to ensure that both download and network block device operated clients are served locally at LAN speed
- For a download-only (i.e. without network block device) operating you may also set up a proxy server or even more elegant a reverse proxy that acts transparently to clients, automatically caching client OS images. If you do so, be sure to appropriately set file size limits so that larger files are also cached.
Modifying DHCP server options
Depending on which product you use, different procedures may apply. We suggest to consult the documentation of the product you use. Most people will either use the DHCP role on a Windows server, or the Unix/Linux-based ISC DHCPD.
Windows
Setting the options on a Windows DHCP server is easy:
- Start > Administrative Tools > DHCP
- Open your server in the tree, and the look for the right scope - in most cases there is only one scope
- Right click on Scope Options
- Click on Configure Options
- Click on 066 and type in the IP address of the boot server, most likely Stratodesk Virtual Appliance
- Click on 067 and type in pxelinux.0 for BIOS, or syslinux.efi for UEFI
- Option 060 should be unchecked
We still advise to check the documentation on modifying your Windows DHCP server options. Good starting points are [1] and [2]. Should you run into trouble, check [3]
Linux/UNIX
If you would like to use an existing Linux based DHCPD server you will need to perform the following steps:
- Log in to your Linux/UNIX server and gain root privileges
- Use your favorite text editor to modify the dhcpd.conf file. The exact location is distribution dependent, e.g. Ubuntu keeps it under /etc/dhcp/dhcpd.conf
- In the global section or in a subnet declaration add the following:
- next-server X.X.X.X;
- X.X.X.X being the IP address of the boot server, most likely Stratodesk Virtual Appliance.
- filename "pxelinux.0"; for BIOS, or filename "syslinux.efi"; for UEFI
- next-server X.X.X.X;
- Restart your dhcpd server
- service dhcpd restart
Stratodesk PXE technical background
PXE operates a PC during booting, so it is implemented as part of the system's BIOS, more precisely it is part of the network adapter's BIOS extension. PXE does not need a local operating system, in fact it is used to boot an operating system from the network location.
This section describes the deep technical steps how the PXE solution is operating. The Stratodesk Virtual Appliances handles all this for you so you do not need to read this, unless you are curious or run into unexpected problems. Technically, this is how a PXE process is running:
- PC is powered on, BIOS takes control, PXE BIOS is loaded
- PXE BIOS does a DHCP request, and gets back
- IP address to use, along with basic network configuration such as gateway, subnet mask
- An IP address of a server where to fetch the boot image (this is defined in DHCP option 66, "next server"). This would most likely be the IP address of the Stratodesk Virtual Appliance.
- A file name, of the file that is to be fetched from this boot server (defined in option 67, "boot file name"). This will most likely be "pxelinux.0"
- The PXE BIOS will use the TFTP protocol to connect to the IP address given above and download it
- pxelinux.0 contains executable code - it will be executed, without any underlying OS, directly from the BIOS level. It will now try to fetch its configuration file from the same IP address, again using the TFTP protocol:
- If a file named pxelinux.cfg/MACADDRESS (with MACADDRESS replaced by the systems actual MAC address in hyphened pair form, like 00-C0-AB-12-34-56), it will be fetched and used as configuration. In a default setup, this will fail as the file does not exist (yet).
- If no MAC-address-specific file exists, the system will fetch the pxelinux.cfg/default file and use it. This file exists and is created by the Stratodesk Virtual Appliance according to the configuration settings you have made and the available images.
- Most likely and by default, the configuration file will contain a reference to a boot menu file, welcome.txt, that will also be fetched via TFTP
- The contents of the boot menu will be displayed, along with a prompt for a few seconds to allow the user to type in a specific "label" that should be booted. This is configurable - you might have already modified the configuration, so this step could be omitted. If nothing is typed in, the system will boot the "default" label, which, in a standard configuration defaults to Live Boot.
- The label will instruct pxelinux.0 to download and subsequently execute two more files, again via TFTP:
- bzImage, which is the Linux kernel executable
- cuba.img, which is the live boot loader; or genesis.img if you have made the installer booting
- The Linux kernel will now boot, taking over control of the machine from the BIOS, and use cuba.img or genesis.img as its root file system, executing its startup scripts. In case you chose the installer, the PXE boot process is finished, the installer is loaded and will display its menu and work as if it was started locally. In case of live boot, the process continues:
- Linux/cuba.img contacts the Virtual Appliance via HTTP to find out about settings, such as which image is to be booted and if download or network block device is to be used. The URL is read from the label command line out of the pxelinux.0 configuration file
- Linux/cuba.img downloads the image via HTTP or sets up network block device
- Linux/cuba.img remounts the image as its "root file system" and passes control on by executing the images init process, as if it was started locally. The image will boot up. It will check label command line parameters again to see where the local configuration cache is supposed to live: Stratodesk Virtual Appliance provides a WebDAV folder and the system will set up itself to use this WebDAV folder as "quasi-local" storage, independent of NoTouch Center. Other than that, it will behave exactly as if it was started locally, will contact NoTouch Center, and do what it is supposed to do.
's welcome.txt file. Please note the special color coding. Apparently this type of color coding is unique to the PXELinux loader and not used somewhere else. The onscreen help will guide you through that.