Introduction
The Stratodesk Virtual Appliance is a 64bit Linux-based Virtual Appliance (VA) intended to run in your local datacenter in a local virtualization platform/hypervisor.
This virtual appliance is not identical to the endpoint operating system NoTouch OS. In fact these are worlds apart even though they are both Linux-based.
It contains an installation of NoTouch Center and a PXE network boot environment to boot up diskless machines into NoTouch OS plus an easy-to-use web-based administration interface to perform tasks such as updating or backing up the Virtual Appliance.
A virtual appliance is intended to be run on a virtualization platform (hypervisor), not on bare metal. This approach has been tested on various platforms, such as VMware ESXi, Citrix XenServer, Nutanix AHV, Microsoft Hyper-V, VMware Workstation, VMware Player, VMware Fusion, Parallels Desktop and VirtualBox.
Get going
Setting up your own Virtual Appliance is easy. Firstly you'll need to download and install the free base OS Ubuntu Linux 22.04. We recommend to use the server edition and can be download from the Ubuntu website.
Important: Also ensure that you have been given access to the NoTouchCenter .deb file download link as this is required as part of the installation process. If you do not have this, please reach out to your Stratodesk representative or email support@stratodesk.com and it will be shared with you.
For those unfamiliar with Linux we have created the step by step instructions for installing an Ubuntu Server virtual machine and the commands needed to create a NoTouch Center Virtual Appliance.
Older method: Deploy the OVA Virtual Appliance
Earlier, Stratodesk maintained an OVA file. OVA/Open Virtualization Archive is the single-file version of an Open Virtualization Format image that can be easily used with many virtualization platforms except Hyper-V. However, the format was not so widespread, and for many popular platforms one had to do all sorts of conversion, like to .vhd for Hyper-V and qcow2 for ProxMox. Therefore we now consider it a better approach to build on a standard Linux OS from a proven vendor, and install the Stratodesk components in there.
These instructions are legacy only: Depending on your hypervisor platform, you have to "import" the VA. For example, the VMware vSphere client calls it "Deploy OVF template". Please refer to your hypervisor documentation for more information. In general, people are fine with just importing/deploying it, and accepting default values:
The VA is preconfigured so that it meets the minimum requirements - if you chose to modify, please do not go below these settings, especially make sure that the VA has at least 8 GB of virtual RAM. Larger installations are advised to assign at least 16 GB of RAM. Furthermore, the Virtual Appliance will only work with one configured network interface. Adding more virtual CPUs or CPU cores will indeed improve performance, recommedend deafult of 4 vCPU's.
First time setup
Some steps have to be done only once:
Set a password
After a few boot messages, the system will display a dialog asking to set a password: You must chose a password now, and we advise you to choose a good password that can not easily be guessed. Avoid things like "test", "notouch", "stratodesk" or similar. You will be asked to repeat your password to make sure you haven't misspelled it.
The password you set here will be used for various services:
- It is the "admin" user password for accessing the Virtual Appliance administration interface
- It is the "admin" user password for NoTouch Center
- It is the "notouchadm" user password for SSH login
Configure network
The VA is configured to use DHCP initially to automatically configure its network. Many people still prefer to set IP addresses on server systems manually, if you want to do so, please press the Enter key to access the "Advanced Menu" as soon as the dialog showing network configuration has appeared. From there you can use your keyboard to set the network configuration to static configuration, and then set IP address, subnet mask, gateway and DNS.
We strongly recommend to set a static IP address (see IP address change procedure why this makes sense) and to create a DNS host name or alias named "tcmgr" pointing to your Virtual Appliance, so that new NoTouch endpoints can find your appliance and subsequently NoTouch Center.
Console interface
On its console (accessible via your virtualization platform tools, such as VMware vSphere Client, or XenCenter), the Virtual Appliance will display a textual information screen. This allows you:
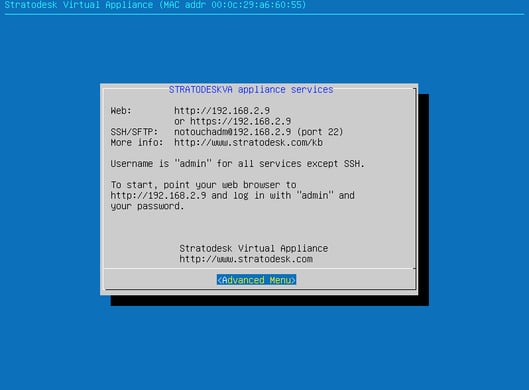
- View URLs and IP addresses of common services, such as the web-based admin interface URL
- Enter the Advanced menu by pressing the Enter key, allowing you to:
- Configure the network, which can be
- configured via DHCP. When set to DHCP, all network configuration will be pulled from a DHCP server. If no DHCP server is present in this subnet, the VA can not operate.
- configured statically. Setting to static opens up the network configuration dialog, allowing to set IP address, netmask, default gateway and at most two nameservers.
- Reset the password (as is done during first boot)
- Reboot the appliance
- Shutdown the appliance
- Configure the network, which can be
Note: The console will blank its screen after some time of no interaction. Since people look seldomly on this console, chances are high that when you access it, the screen will be black. Just press any key, preferably "Shift" or "Alt", to wake the console up.
Web-based administration interface
The Stratodesk Virtual Appliance comes with an easy-to-use browser based administration interface. Simply point your browser to the Virtual Appliance - the IP address is shown in the hypervisor console. So for example when your IP address is 10.1.1.10, then point your browser to https://10.1.1.10. The web interface is made in "wizard-style" and will guide you through all demands so you should be fine without reading through the documentation.
When making your first connection to Stratodesk Virtual Appliance, you will not have a certificate installed, therefore the browser will display the usual certificate warning in more or less dramatic fashion. This is expected. Since you just set up the other system and most probably "own" the network, you can ignore this warning. You may of course buy a certificate from any trusted vendor and install in the VA.
The VA login screen will display
- the username and password prompt for NoTouch Center, and
- a link to the VA's own administration interface
The VA uses HTTP authentication to prevent unauthorized access. The username is "admin", and the password is the one you have set during initial setup. Please note that web browsers may keep your credentials for a long time with HTTP authentication. If you have accessed the system from a PC that is not yours, change the password afterwards, this will reset HTTP authentication.
The web-based administration interface contains these menu items: 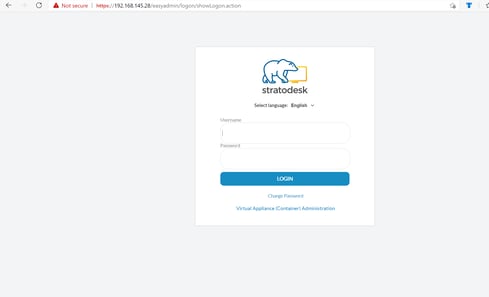
- OS Images
- Display list of client OS images
- Upload new OS images
- Management
- Control NoTouch Center
- Access file storage
- NoTouch-Center-relevant maintenance
- PXE
- VA Operation
- VA Configuration
- View system information and system logs
- Update the Virtual Appliance
- Firewall configuration
- OS/VA-relevant maintenance
- Cloud Xtension
- Reboot and shutdown the VA
- Backup (and restore)
- Collecting NoTouch Center VA Support File
- Applying a Certificate - Securing your VA