Contents
- PCs and Thin Clients (x86)
Installation in NoTouch terminology means to physically write NoTouch on a system's hard or flash drive, overwriting/wiping out Windows or any other operating system that was there. If you just want to run NoTouch for a quick test or side-by-side with the existing OS, do not install, use Live Boot - just run from the boot medium that you created, "live" mode is the default.
NoTouch works on both PCs/Thin Clients/Laptops/Tablets with x86 /x64 (Intel/AMD/VIA/etc) processors and the ARM-based Raspberry Pi 3 or 4 devices
PCs and Thin Clients x86/x64
Installing NoTouch OS is very very easy. Most people choose to use a USB pen drive or PXE/network boot. Alternatively one can burn a bootable CD-ROM from the ISO file that is included in the NoTouch OS download "All-In-One" package. Download this "All-In-One" package first. Another option is to install over a running Windows using MSI Installation.
You might not have to "install" NoTouch OS. It runs well in "live" mode from USB, PXE or CD-ROM for a test, side-by-side with your existing OS. Installing is done when you actually want to wipe out Windows or whatever has been there before.
You can even run NoTouch OS as a Virtual Machine on your Hypervisor
Preparation
Note: For installing with MSI packages, please see here: MSI Installation. This section describes how to install with your own boot medium.
Preparing for installation is easy:
- Set up your boot medium, such as
- Prepare USB drive/stick, or
- Burn the NoTouch ISO on a CD-ROM, or
- Set up PXE Network Boot
- Let the target machine boot from your boot medium (this may require entering the machine's BIOS and changing boot options)
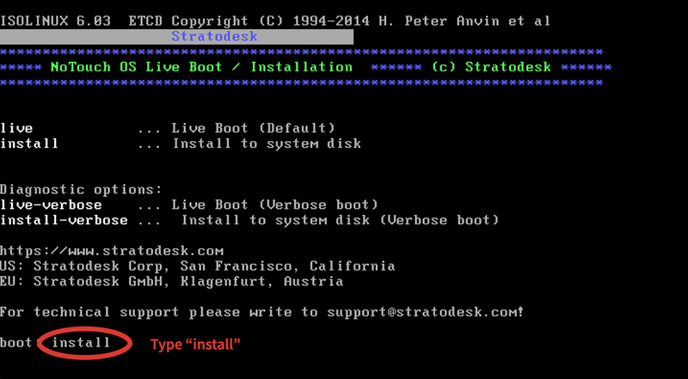
- Immediately after boot, at the boot menu, type in "install" to avoid Live Boot and instead go into the text-based installer (a module called GENESIS internally)
Note: It is possible to customize and pre-load your own configuration - please see here: Configuration preload
Installation procedure
Enter the installer
Make sure you type in "install" or select it with your cursor keys, depending on the menu that appears; Do this immediately when the boot menu appears, after the BIOS runs its startup checks (if you miss that moment, the system will boot to live mode). A text-based installer, sometimes referred to by its internal codename GENESIS, appears.
Note: Install means overwriting whatever is there on the hard or flash drive. There is no uninstall. Only install it when you are absolute sure you want to repurpose this PC into a Thin Client.
Install the system
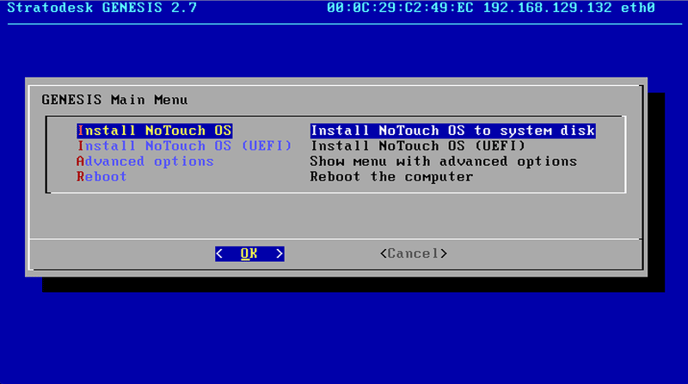
This opens the Stratodesk GENESIS Main Menu. You only have to pick the appropriate Install NoTouch OS option and hit ENTER to start the installation.
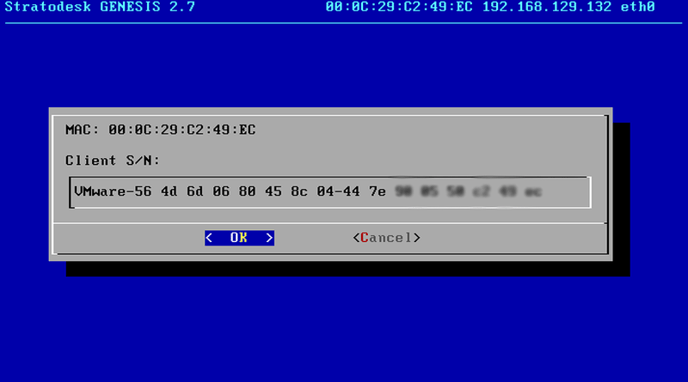
You will be asked for a system serial number. The system will try to read the device identification or serial number from the system's DMI-BIOS. On most brand-named PCs this will correspond to the asset tag sticker, and that is the intended purpose: To match devices to their asset tags. In case the system can not read a number from DMI-BIOS, please copy the asset tag or your inventory id number. For test purposes you can also enter a dummy S/N. The number you enter can later be used in NoTouch Center to identify the device.
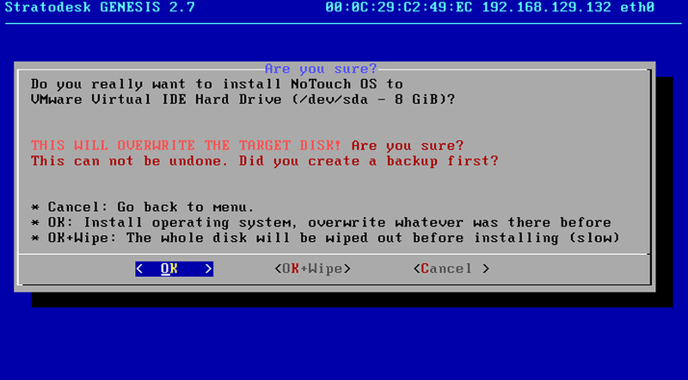
Then the final question if you really want to install the NoTouch OS on the local drive will pop up. Think again! Is there anything of value on the drive? Installing NoTouch will wipe your hard drive. Are you sure?
If you are sure, select OK and hit ENTER.
Actually, there is a second option given, "OK+Wipe". This would securely erase the full disk, a process which can take several hours. For more information, see Secure Erase. Do NOT use this on Thin Clients - this feature is intended for PCs with real hard drives only.
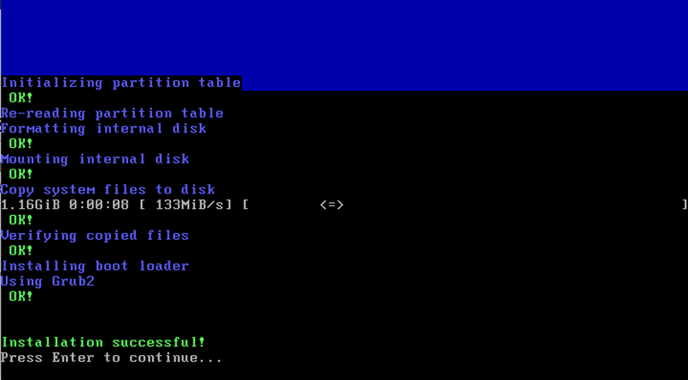
You will get the message that the installation finished successfully and will be asked to press ENTER.
Reboot and enjoy
This will return you to the GENESIS Main Menu where you move the selection down to Reboot and press ENTER. The client will reboot and start up with NoTouch OS.
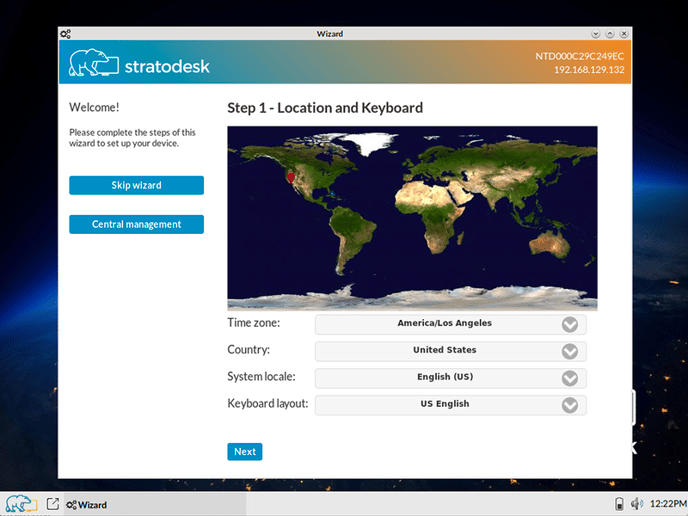
Now you are finished and after the reboot you will see the NoTouch OS Configuration Wizard.
Congratulations! Enjoy NoTouch OS!
After installation
Having installed and rebooted, the First Boot Wizard will appear and guide you through the initial setup. If you ever need to return to this point (e.g. because of misconfiguring the device) you can either install again or do a Factory Reset.
After finishing the First Boot Wizard you can configure NoTouch OS locally or use NoTouch Center.
Installing a custom image
The above method will always copy the NoTouch image on your device. If you want to flash another image, you can put the lfi-file of the image (found in our download area) into the folder "lfis" on the USB drive. Then, after booting into the installer, instead of Install NoTouch OS pick Advanced Option -> Install LFI.
Installing 'over' an existing NoTouch installation
The NoTouch installer does not care what was on the machine before - it will overwrite what it needs to overwrite when installing itself, no matter if it was Windows, Linux, or even an older version of NoTouch. If you plan to install over an existing NoTouch installation, this is ok, but please consider this:
- If you simply want to update, a Firmware Update will most likely be the much easier choice!
- There is a local Firmware Update as well as a centralized NoTouch Center powered Firmware Update.
- If you use NoTouch Center, you need to reset the MKey Authentication key after the factory reset, otherwise the system will not be able to talk to NoTouch Center for security reasons.
Raspberry Pi
NComputing RX-HDX
You can repurpose and install Stratodesk NoTouch OS (NTOS) on NComputing Raspberry Pi devices and then manage them with Stratodesk NoTouch Center (NTC).
Generic Raspberry Pi models
Generic Raspberry Pi's are easily converted to running NoTouch by reflashing the SD card.
- Take the SD card from the Raspberry and insert it into your PC or Mac via an SD card reader
- Unzip the NoTouch ZIP file. Double-check if you have an ZIP file with "-arm64-" in the file name.
- On Windows, execute FlashSDcard.cmd.
Note for Mac or Linux users: Yes, you can flash the SD card on Mac or Linux too. Find out which device node represents the SD card reader - e.g. on Mac use Disk Utility. Then use the dd shell command as root, such as
dd if=lnx-2.40.1864-EEs-k404-armhf-160604.bin of=/dev/disk2 bs=16m
Jetson Nano
Generic Raspberry Pis are easily converted to running NoTouch by reflashing the SD card.
- Take the SD card and insert it into your PC or Mac via an SD card reader
- Unzip the NoTouch JETSON ZIP file. Double-check if you have an ZIP file with "-JETSON-" in the file name.
- On Windows, execute FlashSDcard.cmd.
Note for Mac or Linux users: Yes, you can flash the SD card on Mac or Linux too. Find out which device node represents the SD card reader - e.g. on Mac use Disk Utility. Then use the dd shell command as root, such as
dd if=lnx-2.40.5633-JETSON-k409-arm64-190804.bin of=/dev/disk2 bs=16m