This article explains how to use locally connected printers. We suggest to use network printing and keep printers off the desktop infrastructure but there are situation where printing to locally attached printers in unavoidable.
Contents
VDI Printing Background
When printers are connected to Thin Clients, there are these important questions to be considered:
How is the print job transported to the client?
Regular network printing
Most probably you are familiar with how network printers work. Either they have Ethernet or WLAN interfaces built in or you bought an extra "print box", but basically they have an IP address and potentially a queue name. On the Windows side you would say "TCP/IP printing" and make sure Windows knows about IP address and queue name. There are two different printing protocols:
- LPD/LPR. This refers to the Line Printer Daemon protocol that has been around forever, more or less. All networked printers and printserver boxes support this.
- Raw port 9100 printing. This is a protocol popluar with Windows, basically a TCP port will be opened and everything that arrives on this port will be passed on to the printer without interpretation (hence, it's called "raw" printing).
NoTouch supports both of them, as does Microsoft Windows.
Printer forwarding
Some VDI protocols do add another option - they allow to send print jobs within their regular protocol - a feature called "printer forwarding" or "printer mapping". For now only the RDP and ICA/HDX protocols can do this, thus this particular feature will work with Microsoft Remote Desktop services and Citrix products only. VMware Horizon can do that too (even though the PCoIP protocol natively does not do that), VMware has a "logical printer forwarding" mechanism that is technically based on ThinPrint (but don't confuse it with the regular NoTouch ThinPrint support).
Where is the printer driver and where does the rendering take place?
You know that every printer comes with driver(s) and you know that drivers are usually installed inside a Windows operating system (and not inside a printer or a LAN print server or so). However, some people prefer to install printer drivers on endpoints instead of terminal servers / VDI desktops. Citrix for example calls this "universal printing", inside the VDI Windows you don't have any printer driver then and leave everything to the endpoints. This may sound contradictory to the idea of slim endpoints.
In case of NoTouch, since NoTouch is based on Linux, instead of the normal Windows printer drivers so-called PPD files (available from printer manufacturers) serve as "drivers".
Advantages of keeping Windows printer drivers on the server/VDI side of things are:
- End users see and work with familiar printer dialogs
- Using original Windows drivers means all the printer's features can be accessed
How does USB device forwarding fit into the picture?
Well, not at all. If you use a VDI product that supports generic USB device forwarding and you forward a printer with that technology, NoTouch is not concerned with the device or the printing any more. Everything is done inside the Windows VDI desktop. If you intend on forwarding local printers via generic USB forwarding, stop reading here - this article does not apply.
Printer Configuration
The main printer configuration is located under "Drivers/Printer", both locally on the client as in NoTouch Center. Several printer objects can be configured.
NoTouch OS
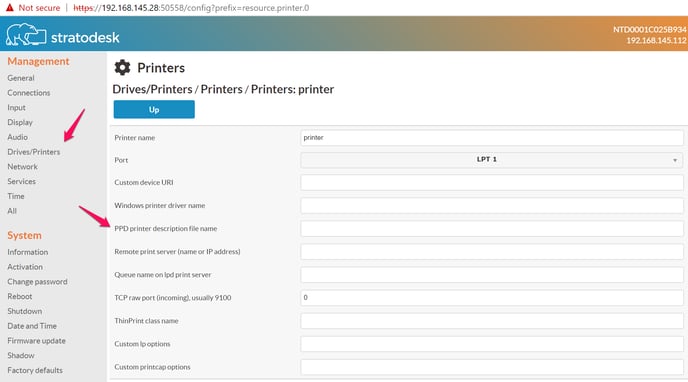
When working in the local configuration, click on "Drives/Printers" and then either add a new printer object or edit an existing one. The configuration of a printer object looks like this:
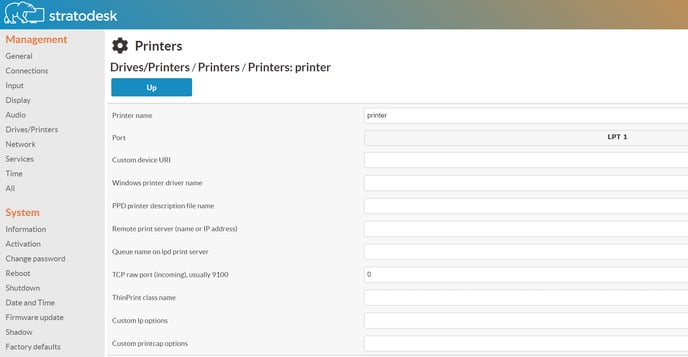
These are the parameters that can be set:
- Printer name. This is an internal printer name. Most people are fine with the default name of "printer". Please do not use spaces or special characters. Just something like printer1, printer2, or so.
- Port. This refers to where the printer is connected to:
- USB 1. The first found USB printer. Please note - USB ports are not numbered, so it does not matter to what port the printer is plugged into. If you have just one USB printer, use USB 1, no matter where it is connected to.
- USB 2. The second found USB printer. It may be a bit tricky to find out which is the first and what is the second, but we find having two USB printers connected to one PC/TC is very very rare.
- LPT 1. The first parallel port.
- LPT 2. The second parallel port.
- COM 1. The first serial port.
- COM 2. The second serial port.
- USBSerial 1. If you use a USB-to-Serial converter.
- Remote Printer. Use a remote/networked printer using the LPD protocol.
- Samba Remote Printer. Use a remote/networked printer using Windows printer sharing.
- Windows printer driver name. This is for logical printer mapping of RDP and ICA protocols. If you type in the name of a Windows printer driver name, the Windows system that you are connecting to will know what driver to use. So you can chose from one of the printer drivers that are installed on the Windows system. The spelling must match the Windows driver name exactly.
- PPD printer description file name. If you want to do local print job rendering, this is the name of the PPD file to use. You need to make sure the PPD file is present on the system.
- Printer server name/address. If the printer port (see above) is set to "Remote Printer" or "Samba Remote Printer", then and only then this parameter has a meaning: the hostname or IP address where to find this remote printer.
- Queue name on print server. If the printer port (see above) is set to "Remote Printer" or "Samba Remote Printer", then and only then this parameter has a meaning: the remote printer or print queue name.
- TCP printing port. This refers to the raw printing protocol, or what is widely known as "port 9100 printing". If you set this parameter to 0, the functionality is disabled. If you set it to a non-zero value, the system will open a TCP port that will directly forward all communication to the printer. Most people will use the value of 9100 and configure Windows accordingly.
- ThinPrint class name. If you use ThinPrint, this will be the class name. Please consult the ThinPrint documentation for what this is supposed to be.
- Windows user name. If you choose to print to a remote Windows printer ("Samba Remote Printer") and your Windows system requires user authentication, type in the name of the user account here.
- Windows user password. If you choose to print to a remote Windows printer ("Samba Remote Printer") and your Windows system requires user authentication, type in the name of the user's password here.
- Windows user domain. If you choose to print to a remote Windows printer ("Samba Remote Printer") and your Windows system requires user authentication, type in the name of the user account's domain here.
- Custom lp options. Here you can supply custom lp options. Normally this should not be necessary, but it gives you additional control over the system, if you are willing to go more towards the Linux operating system level. Please see here for more information: lpoptions
- Custom printcap options. In Linux terms, these printer definitions create a printcap file. With that parameter you can add custom settings to the printcap. Normally this should not be necessary, if so, please look here for more information: printcap
NoTouch Center
Configuration in NoTouch Center works equally easy - same parameters, same options:
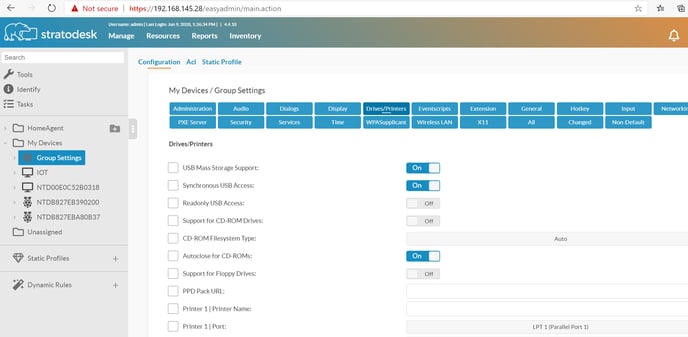
The only visible difference is that in NoTouch Center, the printer objects are already there - you don't have to click on "Add new" as you do on the client. Up to four printer objects can be defined that way.
Note: Older versions of NoTouch Center (up to 4.1.25 use a more complicated approach). If, and only if, you use such a legacy version please check here: Legacy NoTouch Center Printer Configuration
Printing-related services in NoTouch
The main component handling printing is CUPS, the Common Unix Printing System. CUPS is enabled by default and can be controlled within the "CUPS" parameters inside the "Services" parameter subgroup. These parameters are available:
- Start CUPS. This is the master switch for CUPS. Default is on, if you switch it off, all printing will be disabled.
- Allow remote access. By default, CUPS will not listen on the network for security reasons. This will allow inbound CUPS-related communication to happen also via the network. (Note: For printing to remote printers, you do not need to enable this).
Second, there is the LPD component that implements the LPD/LPR functionality. Also under "Services", there is the "Start LPD" parameter, that is also on by default. If you switch it to off, no printing via LPD can happen (though raw printing will still work).
Furthermore, there is ThinPrint - please see its own article for information about the ThinPrint service and configuration.
Printing scenarios
Printer mapping
This applies to the "printer mapping function" of RDP, Citrix ICA/HDX and VMware Horizon View protocols only.
- Create the printer object and assign a name such as printer1
- Set the port correctly
- For automatic printer driver assignment, please make sure the you have the correct driver installed in the VDI desktop / terminal server and you have typed it into the "Windows printer driver name" parameter.
- Make sure these parameters are on (either in the FreeRDP or the Citrix or VMware Horizon parameters, depending on connection mode) - see screenshot below:
- Local printer mapping
- Include system-defined printers in mapping
- Note: VMware Horizon View knows only one parameter, "Logical printer forwarding", referring to its ThinPrint-based mechanism.
- Make sure you all your terminal server policies and Citrix policies allow printer mapping - to this station, to this users. The #1 problem reason is having this disabled on Windows!

When logging into Windows, you'll see an auto-created printer now. You can use the regular Windows printer dialogs to print a test page.
NoTouch as a print server
NoTouch can act as a print server using either LPD or Raw printing. In fact, by creating a printer object, it will be accessible via LPD automatically. For raw printing, you need to set the "TCP port number" parameter to a meaningful value. Most people will chose 9100 here since this is the standard port on Windows.
Setting up the printer in Windows is easy. Create the printer, select a driver, and chose a remote port. Chose either "Microsoft TCP/IP printing" or "TCP raw printing" depending on if you want to use LPD/LPR or raw printing. Make sure you type in the correct host name or IP address.
An external guide for setting this up can be found here: Configuring Printserver Printing on Windows This external web page tells you to set LPR in step 7, should you prefer to use 9100/raw printing, then please select "Raw" instead of LPR.
Printing from local applications
If you need to print from a local application, such as the builtin Firefox web browser, you have no Windows server that you can install printer drivers on. In that case, you must spool and render the jobs locally, requiring proper PPD files. However, there are just two things that need to be done:
- Get a PPD file and upload it to the End Point client by connecting with your PC's web browser to the Client End Point via it's IP address
- Set the name of the PPD file to the "PPD printer description file name" parameter.
You can also use NoTouch Center to distribute PPDs. Put the PPD file on a web accessible folder somewhere in your network, and then type in the complete URL into the "PPD pack URL" parameter under "Drives/Printers".
Notes
- Make sure that the LPT or USB port is enabled in the PC's BIOS
- When using the parallel (LPT port) make sure that the EPP (Enhanced Parallel Port) mode is defined in the PC's BIOS