Notouch OS supports wired networks, centrally managed 802.1x authentication and VLANS
Even in today's WiFi age, most people will still rely on wired networks (Ethernet) in corporate setups. By default, NoTouch will try to get its IP configuration from a DHCP server via the Ethernet interface, so most people will not have to modify anything here.
For specific Ethernet options, VLANs, IEEE 802.1X port security however, you have plenty of ways to configure the system according to your needs.
Contents
Ethernet configuration parameters
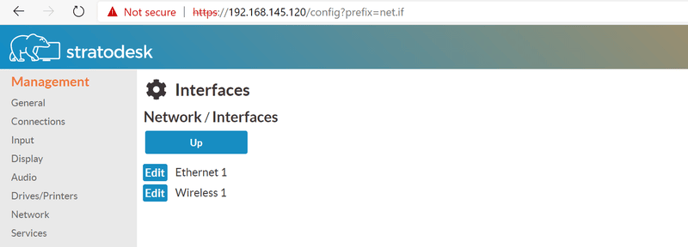
Just open the local configuration application. Click on Network, click on Interfaces, then on "Ethernet 1" you are in this interfaces' configuration.

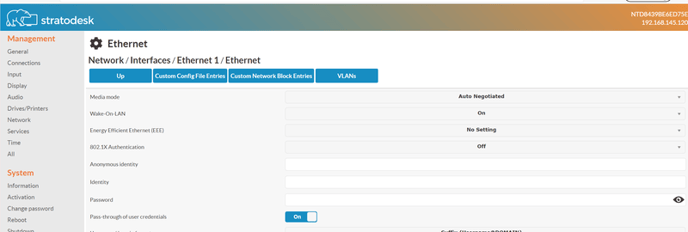
Then click on Edit \ Ethernet to enter the subsection of Ethernet parameters. In NoTouch Center would simply go to the "Ethernet" tab.

Basic settings
- Media Mode. By default, the Ethernet media mode will be auto-negotiated with the network switch. You may also set it to a combination of
- 10 MBit, 100 MBit (Fast Ethernet), Gigabit Ethernet, and 10G-Ethernet, and
- full-duplex or half-duplex
- Wake-On-LAN. If you want to make the system boot by sending a special "magic packet" over the network, have this parameter at "on". Not all systems support Wake-On-LAN, not all PC BIOSes will allow this to be on, not all networks allow magic packets going through - your mileage may vary. For more information please, see here: Wake-On-LAN
- Energy Efficient Ethernet (EEE). This parameter allows to enable or disable the EEE functionality. Some newer adapters support this, and together with some switches it may work or not work. If you feel you have network problems please deactivate this - some network switches, even those made by brand-name manufacturers, are poorly implemented in terms of EEE.
IEEE 802.1X Authentication
Port security based on IEEE 802.1X will prevent unauthorized machines from accessing the network. This mechanism provides a reasonable security when you do not know who will plug in a - potentially malicious - computer into one of your Ethernet/RJ45 jacks. While some aspects remind you of Wireless LAN security, IEEE 802.1X is different in many aspects.
There is only one main parameter to switch it on and select the actual operation mode:
- 802.1X Authentication. This parameter enables a specific mode of operation for 802.1X:
- off. No 802.1X is used.
- PEAP-MSCHAPv2.
- EAP-TLS.
- MD5.
Username/Password
For username/password authentication scenarios, there are three ways how you can handle that:
- Pre-configure/store user credentials in the configuration. This would work either with
- Machine accounts, e.g. for a public machine that has a machine username and password
- User's desktops where the user would never change (quasi-private machines).
- Pass-through the user's VDI credentials to the Ethernet stack.
- Both. In that case, when nobody is working at the machine, the pre-configured username/password will be used to get on the network, if somebody logs in the connection would be reset and a new connect based on the user's credentials will be made.
Preconfigured/stored credentials
These parameters allow to store credentials on the machine:
- Identity. The username to connect with.
- Password. The user's password (not to be confused with the WLAN passphrase).
Note: NoTouch does encrypt stored passwords, of course. However, all these mechanisms can be broken, it's just a matter of investing enough time and money. We suggest to not rely on stored credentials.
Username/Password pass-through
For several connection modes, NoTouch shows a login dialog and lets the user type in their credentials: username, password and potentially a login domain. These credentials can be passed on to the WiFi stack, resetting the existing WiFi connection and authentication with these credentials. For this to happen, it must be enabled both in the network configuration and in the connection parameters.
These parameters govern the pass-through:
- Pass-through of user credentials. Set this to on (default), if you want the functionality being enabled. Note - this alone is not enough, you have to enable it in your connection as well.
- Pass-through username/domain format. Define if the domain should be passed on the WiFi stack in prefix (domain\username) or suffix (username@domain) notation or not at all.
- These parameters in your connection's Extended section:
- Pass-through of user credentials. Set this to on, if you want the pass-through to happen. By default, this is off.
- Reset Ethernet connection. Set this to on, if you want your credentials to be passed on to Ethernet connections. By default this is off.
So to summarize, for pass-through to happen, you need to go to the Connection / Extended parameters and enable at least "Pass-through of user credentials" and "Reset Ethernet connection". Read more about this here:
When the VDI connection exits, the Ethernet connection will be reset. In that case, the preconfigured/stored credentials will be used, if some are defined, until the next users logs in.
Certificate based authentication
Please refer to Certificates to find out how to upload and distribute certificates and key files.
- Root certificate. The root certificate of your authentication authority.
- Client certificate. The certificate of the client to be presented to the server.
- Client key. The certificate's key file. Without such a key the server would not know if this client is the rightful owner of the certificate, so this can not be omitted.
Other parameters
It would be very rare that you had a reason to modify these parameters:
- PEAP label version. Defines if version 0 or version 1 of PEAP labels should be used. The default value of "auto" will chose the best one.
- EAP fast re-authentication. By default, fast re-authentication will be used, so this switch can be used to disable this.
- IEEE 802.1X/EAPOL version (default 1, newer systems use 2). Governs the EAPOL version to be used.
If you need to create a more complicated setup, such as using an authentication method that is not present here or creating more than one preconfigured WiFi setups, please read on here: WPASupplicant
VLANs
NoTouch supports "tagged" VLANs, that means on an Ethernet wire where multiple VLANs are living together, NoTouch can be made to talk on one or more of these virtual LANs by adding the VLAN tag to the Ethernet frame.
Clicking on the "VLANs" parameter subsection reveals a list of configured VLANs. If you click there first time, the list will be empty. After creating a new section or editing an existing one, you will see the configuration of a specific VLAN.

The following parameters make up one VLAN definition:
- VLAN ID (0-4095). The ID of the VLAN.
- Reorder header flag. Set this if you have a specific reason to reorder the packet header to make it look like a regular Ethernet header. Most people are fine with the default, so use only if you have a specific reason such as problems with packet filtering or certain network equipment.
- User-defined shell command. A Linux shell command that will be executed on creating the VLAN (for Linux experts: this will be part of vconfig-add).
- IPv4 configuration. Defines if the IP configuration should be configured dynamically (DHCP) or statically (see parameters below) or disabled at all.
- IP address. If the IP configuration is set to static, this parameter contains the desired IP address.
- Subnet mask. If the IP configuration is set to static, this parameter contains the subnet mask to be used.
- Gateway. If the IP configuration is set to static, this parameter contains the desired default gateway (router) address.
Note: Even if one or more VLANs are configured, the system will still operate the "normal" non-VLAN connection. In most cases you won't even notice, because no DHCP server will be available. If you want to explicitly shut down the non-VLAN Ethernet operation, simply set the IPv4 configuration parameter of the Ethernet interface to "disabled".
