An essential part of today's security that is based on HTTPS, SSL, X.509, PKI are certificates. Certificates are small documents that are used to prove that a specific key really belongs to a specific person, avoiding man-in-the-middle-attacks. From a pure system administration point of view, certificates make extra work. The good news however is, that NoTouch supports working with certificates in all - very diverse - areas.
The punchline is: You can upload certificates to individual machines via web browser, and you can have NoTouch Center distribute your certificates to a huge number of machines. These certificates can be used for Network authentication, web browser, the Citrix Receiver, the VMware Horizon View client, the FreeRDP Remote Desktop Protocol client and other services.
In general, certificates need to be in .crt form - textual files (ASCII) that start with "---- BEGIN CERTIFICATE ----". This format is called Base64-encoded DER format. Exceptions to this rule may apply but to be safe always try with a .crt file first.
Contents
The importance of system time
Please make sure your endpoints have a correct system time - see Time and time zone. Watch out especially on Raspberry Pi-based endpoints as these do not have a battery-powered clock.
Most probably you'll want to use the NTP protocol and make sure your clients get an accurate time automatically.
Certificates have a start and an end date. If your system time is off, certificate validation will fail!
Adding certificates
NoTouch comes with all standard certificates that are available from the well-known PKI vendors; everything that is current at the time of a particular NoTouch release are included. Most people buying a certificate from such a vendor will never need to add certificates. In these cases, it may be necessary to add your own certificates:
- You are using private certificates (self-signed or from your own certificate authority)
- You bought a certificate from a new vendor whose certificates where not yet included in our repository
- A well-known vendor has issued a new root certificate that was not available at the time this particular NoTouch image was built
Keep a few guidelines in mind:
- SHA-1 certificates are deprecated and applications like Citrix Workspace App will reject that. SHA2 (e.g. SHA256) is required.
- If your server certificate was signed by a sub-CA, the server must send the certificate chain or you must supply the intermediate CA certificates. This is a very common problem.
- Certificates you upload must be named .crt and be in human-readable form (starting with ---- BEGIN CERTIFICATE ---, what is called 'Base64-encoded DER'). If the file you plan to upload is not human-readable, you are using the wrong format.
- Please avoid having whitespaces and non-ASCII characters in the file name (no accented characters, no umlauts)
Intermediate certificates
Problem: You have your root CA certificate installed, it may even work on Windows, but it still doesn't work on NoTouch. Of course, you have gone through the checklist, the system time is correct, the format is correct, etc. What now?

If your web server is configured correctly and supplies the certificate chain, i.e. provides the "DigiCert SHA2 Secure Server CA" during the HTTPS handshake, the connection will still work, because your browser knows "DigiCert Global Root CA" that was used to sign "DigiCert SHA2 Secure Server CA". With well-known public websites that is almost never a problem.
Very often we see in corporate networks, especially with servers running Microsoft Internet Information Server (IIS) that these do not supply the certificate chain correctly. You can find lots of bug and problem reports. NoTouch supports uploading intermediate certificates, but the correct way is to get your server fixed.
Method 1: Upload certificates into a NoTouch machine

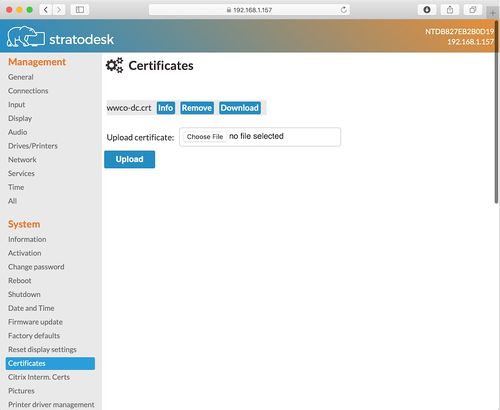
- Point the web browser of your normal work desktop to the IP address/hostname of the NoTouch machine, using https
- Login with your client admin password
- Scroll a bit down to find the "Certificates" menu entry
- Upload your certificate file(s)
In this overview you can also delete an existing certificate or view detailed technical information about the certificate, using the buttons next to each certificate file name.
Local client diagnostic view
Navigating to "Debug information" in the left menu bar and then selecting "Certificates" will print detailed technical information about all uploaded certificates. This is similar to using the "Info" button on one specific certificate.
Method 2: Distribute certificates with NoTouch Center

Most people will probably be fine with the Global distribution feature.
Global distribution
The easiest distribution feature usually used for your private CA root certificates:
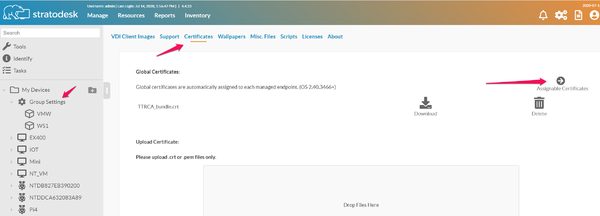
- Log in to NoTouch Center
- Navigate to Resources -> Certificates
- Upload a file to the "Global Certificates" section
All files of the "Global Certificates" section will be distributed to all client machines that are managed by this NoTouch Center instance.
Selective distribution
In case you want to distribute certificates only to select clients, first upload them to the "Assignable certificates" section (also under Resources -> Certificates) to make them available.
Then, in your group or on your client, click on the Security tab and select the certificate from the "Available certificates" parameter.
Machine-specific certificates
Machine- or client-specific certificates usually include a certificate and a private key, usually split in two files, one ending in .crt, the other ending in .key. When referring to a few clients, you can upload both private .crt and .key files using their individual configuration applications.
For larger numbers of clients, NoTouch Center has two elegant mechanisms:
GUI machine certificate repository
You can easily assign machine-specific certificate and key files to an individual machine in NoTouch Center.
- Click on the client
- Click "Machine certificates"
- Upload your files
Files uploaded here will only go out to this specific client.
Filename based distribution
This requires shell/filesystem access to the NoTouch Center installation.
- Create a directory named "certificates" under the NoTouch Center installation directory, if it doesn't already exist
- On a Stratodesk Virtual Appliance, that would be /opt/center/certificates
- Depending on how you want to distribute the certificates, please create one or more of these subdirectories inside certificates:
- by-hwaddr. Certificate files are expected to be in the form of MACADDRESS.crt or MACADDRESS.key, referring to the hardware address ("MAC address") of the first Ethernet port of the system. All uppercase, no colons, no dashes.
- by-serial. This directory is expected to hold files matching system serial numbers.
- by-hostname. This directory holds files matching a system's host name. Note: We actually discourage using this because host names can change. However, you know what you are doing.
In other words, for every client checking in, NoTouch Center will search these directories if there are files that match the client's MAC address, serial number or hostname and then send all matching certificates down to this client.
Advanced operations
Certificate formats and conversion
NoTouch in general supports X.509 certificates in PEM and DER formats - since there are so many different applications in NoTouch ranging from open-source to proprietary third party binaries, it is difficult to make such a general statement though.
User certificate and private key can be included in the same file. If the user certificate and private key is received in PKCS#12/PFX format, they need to be converted to suitable PEM/DER format. This can be done, e.g., with following commands on any machine having OpenSSL installed (Windows, Mac, Linux):
Convert client certificate and private key to PEM format
openssl pkcs12 -in example.pfx -out user.pem -nodes
Convert CA certificate (if included in PFX file) to PEM format
openssl pkcs12 -in example.pfx -out ca.pem -cacerts -nokeys
Please consult the OpenSSL documentation for more information.
Install manually from USB device
It is also possible to fetch certificates from a USB device. This requires a little Linux interaction and knowledge. If you are not familiar with the command line and basic Linux commands, we suggest using other methods described above.
- Open the "Console" from the "Diagnostic" section
- Get root permissions by using the "su" command
- Copy the files from /tmp/devshares to /config/certificates. An example command sequence (depending on actual USB device mount point) would be:
        mkdir -p /config/certificates
        cp /tmp/devshares/usb0/*.crt /config/certificates
        sync
        reboot
Download a prepared certificate bundle
If for some reason you cannot use NoTouch Center's built-in certificate mechanisms, you can still have the clients simply download a .crt file or a .zip bundle from a URL:
- Place your certificate file on any web server where it is accessible to your NoTouch-powered machines by HTTP or HTTPS. Think of firewalls that could inhibit successful downloads. If there are more files, add them all into a plain ZIP file. If you do not have a web server, you can store files on the Stratodesk Virtual Appliance or, if you don't have the Virtual Appliance, store them with a NoTouch Center installation.
- Enter the full URL to the .crt or .zip file into the "Certificates download URL" parameter, like http://myserver.mycompany.com/mycerts.zip - you find this parameter on the client under All->Security->Certificates and under "Security" parameters in NoTouch Center.
On next reboot, the certificates will be available.
Using certificates
Having certificates uploaded or deployed means that they are there on the system. Different modules in NoTouch use certificates differently, so please see here for appropriate instructions:
- Citrix Receiver and VMware Horizon View client use available certificates automatically if needed. No further actions needs to be done
- Wireless LAN in certain authentication modes can require certificates
- In Network authentication, be it wired IEEE 802.1X or WiFi WPA/WPA2, certificates need to be selected by appropriate parameters. Please consult the articles about Network authentication. When writing your own wired or wireless authentication configuration with WPASupplicant you may need to have certificates
- The Firefox web browser automatically uses such certificates in NoTouch 2.35.65 and above. Earlier versions need to manually add security exceptions.
- General usage. NoTouch places the certificates available in the standard directories where most typical Linux software expects them and can make use of them. That means that other 3rd-party tools not mentioned here will most likely work with these certificates without any extra effort.
